Choking is a blockage of the upper airway/throat by food or other objects, which prevents a person from breathing effectively. Choking can cause a simple coughing fit, but complete blockage of the airway may lead to death.
Choking is a true medical emergency that requires fast, appropriate action by anyone available. Emergency medical teams may not arrive in time to save a choking person’s life.
In adults, choking most often occurs when food is not chewed properly. Talking or laughing while eating may cause a piece of food to “go down the wrong pipe.” Normal swallowing mechanisms may be slowed if a person has been drinking alcohol or taking drugs, and if the person has certain illnesses such as Parkinson’s disease.
Choking Symptoms
If an adult is choking, you may observe the following behaviours:
Coughing or gagging
Hand signals and panic (sometimes pointing to the throat)
Sudden inability to talk
Clutching the throat: The natural response to choking is to grab the throat with one or both hands. This is the universal choking sign and a way of telling people around you that you are choking.
Wheezing
Passing out
Turning blue: Cyanosis, a blue colouring to the skin, can be seen earliest around the face, lips, and fingernail beds. You may see this, but other critical choking signs would appear first.
If an infant is choking, more attention must be paid to an infant’s behaviour. They cannot be taught the universal choking sign.
Difficulty breathing
Weak cry, weak cough, or both
How to help someone who is choking?
Do not hesitate to call for emergency help if you believe a person is choking. Do not attempt to drive a choking person to a hospital emergency department.
What to do if a person is choking:
It is best not to do anything if the person is coughing forcefully and not turning a bluish colour. Ask, “Are you choking?” If the person is able to answer you by speaking, it is a partial airway obstruction. Stay with the person and encourage him or her to cough until the obstruction is cleared.
Do not give the person anything to drink because fluids may take up space needed for the passage of air
If the material is not yet removed, then follow Heimlich manever.
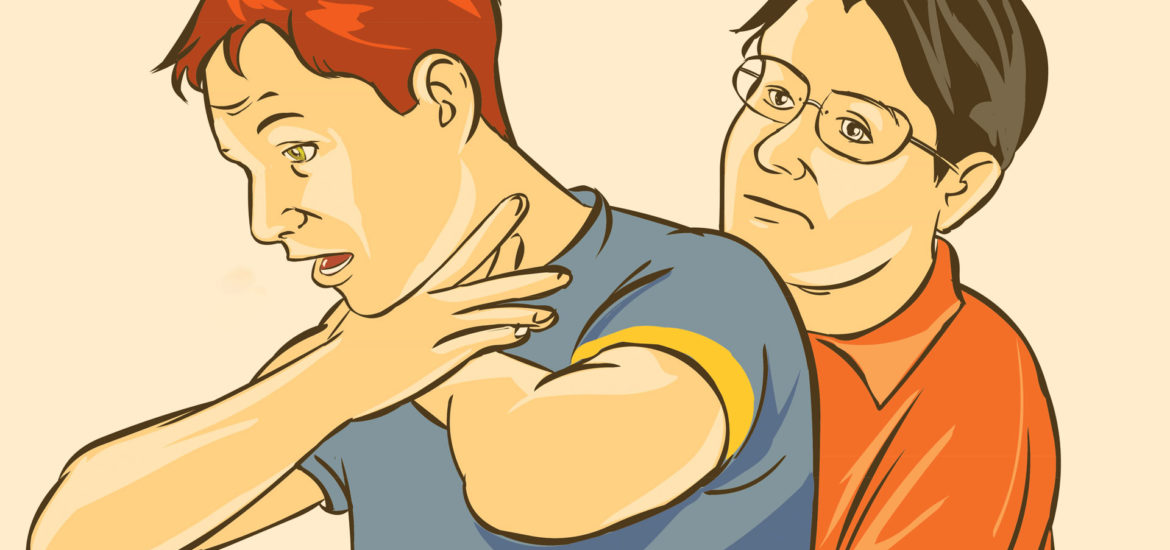
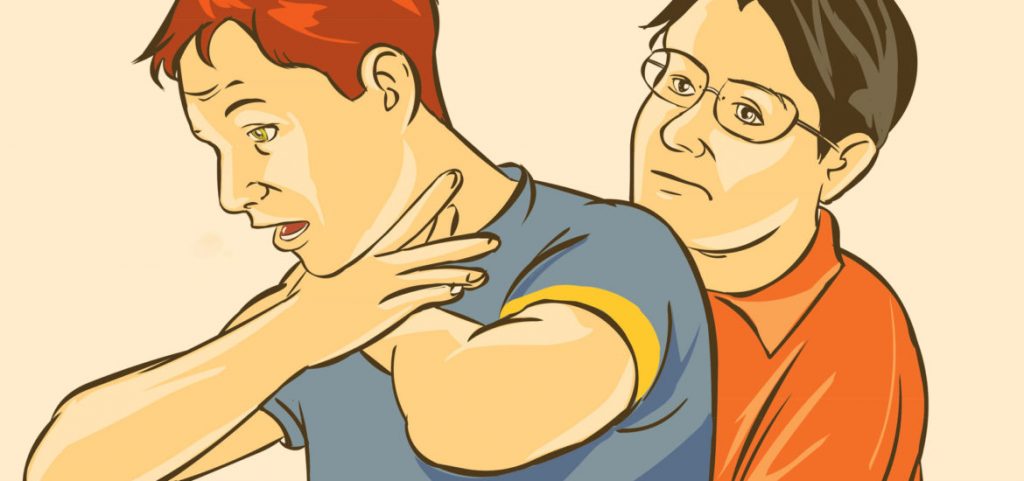
Heimlich maneuver steps
Comfort the victim. A person will start to panic when they are choking. Go to the victim and reassure them that you know the Heimlich manure and begin assistance. Let the sufferer know that he must remain calm, and should follow your instructions. Then get working!!
Have the choking victim stand. For the Heimlich maneuver to work successfully, the choking victim must be up on their feet. If the victim is unstable or panicking you can help support them
Get behind the person who is choking. For the next phase of the Heimlich maneuver you need to put yourself in the right position. Get behind the person who is choking.
Carefully hug the choking victim. Place your hands around the victim’s chest when you are standing behind the victim. The victim’s arms should be up and away from yours. You have to get a good hold on the person’s trunk.
Close your hand in a fist. As you are hugging from behind, put your hand exactly in the middle of the person’s chest in the form of a fist. Do not tuck your thumb into your hand; it needs to be on the outside, pointed up. Place your fist above the area of the navel (belly button). There is no time to be modest and it may be required that any heavy clothing worn by the victim be removed to find the proper first placement. Whatever needs to be done in order to keep the victim from choking to death must be done.
Take a hold of your fist. Create the perfect circle when you grab your fist with your free hand. Do not release your grip on your fist.
Begin to thrust. Hold your arms closely; with the one hand still closed tight, push inward and up in one motion. You need to thrust hard on the victim’s abdomen. To dislodge the object blocking the victim’s airways, do the strong fisted thrust five times squeezing stronger each time. A firm thrust will also bring air from the person’s airways, making them cough. To do it right, you have to go deep, although it may hurt the victim. Don’t let this worry you! He will always be thankful for your forceful methods when he can breathe once again. Keep doing this until the item they were choking on is expelled.
Through out the Heimlich maneuver, it is vital to keep a good hold of the victim in case becomes unconscious. If the maneuver is successful, sit the victim down again and don’t leave him until his breathing gets back to normal.
To read more on First Aid, click on the link below.
Resuscitation is the process of correcting physiological disorders (such as lack of breathing or heartbeat) in an acutely unwell patient. It is an important part of intensive care medicine, trauma surgery and emergency medicine. Well known examples are : cardiopulmonary resuscitation and mouth-to-mouth resuscitation.
First aid kit contents and supplies checklist
Sterile dressings and plasters:
Plasters: Use plasters for small cuts and grazes.
Sterile pad: For more cushioning you can use a sterile pad and hold it in place with sticky tape. You could also use any clean, non-fluffy material, like a cloth scarf.
Sterile wound dressing: A sterile wound dressing is a sterile pad attached to a bandage. These are for larger wounds to apply pressure to help stop bleeding and are quick and easy to put on in an emergency.
Bandages:
Roller bandages: Roller bandages are long thin bandages rolled up. Use a roller bandage to support joint injuries, hold dressings in place, put pressure on wounds to stop bleeding, and to reduce swelling
Triangular bandages: Triangular bandages are large triangular shaped pieces of cloth. You can fold a triangular bandage to use as either a bandage or sling, or, if sterile, as a dressing for large wounds and burns.
Protective items:
Disposable gloves: Using disposable gloves reduces the risk of infection between you and someone you’re helping. If they’re available, always wear gloves whenever you dress wounds or deal with any body fluids or waste
Face shields or pocket masks: These are designed to prevent infection when you give rescue breaths.
Other items:
Cleansing wipes, alcohol free wipes: To clean the skin around the wound
Gauze pads as dressings: To use as padding, or as swabs to clean around wounds
Sticky tape (adhesive tape): To hold dressings in place or to hold the loose end of bandages
Pins and clips: To fasten the loose end of bandages
Scissors, shears and tweezers: To cut sterile pads, bandages or sticky tape to the right length. You can also use them if you need to cut someone’s clothing, so that you can get to a wound, for example.
Useful extras:
Use kitchen film or clean plastic bags: To dress burns and scalds
Use alcohol gel: To clean your hands if you can’t find any water to use
For outdoors:
Use a blanket: To keep someone warm and protect them from the cold
Use survival bags: To keep someone warm and dry in an emergency
Use a torch: To help you see when it gets dark and to attract attention or make others aware that you’re there
Use a whistle: To help attract attention and get help
For the car, in case of road accidents:
Warning triangle: Put this on the road to warn other drivers to slow down
Wear a high visibility jacket: To make sure drivers can see you and reduce the risk of you getting hurt as well.
CPR with rescue breaths
Adults
Place the heel of your hand on the centre of the person’s chest, then place the other hand on top and press down by 5-6cm (2-2.5 inches) at a steady rate of 100 to 120 compressions per minute.
After every 30 chest compressions, give two rescue breaths.
Tilt the casualty’s head gently and lift the chin up with two fingers. Pinch the person’s nose. Seal your mouth over their mouth and blow steadily and firmly into their mouth for about one second. Check that their chest rises. Give two rescue breaths.
Continue with cycles of 30 chest compressions and two rescue breaths until they begin to recover or emergency help arrives.
Children over one year old
Open the child’s airway by placing one hand on the child’s forehead and gently tilting their head back and lifting the chin. Remove any visible obstructions from the mouth and nose.
Pinch their nose. Seal your mouth over their mouth and blow steadily and firmly into their mouth, checking that their chest rises. Give five initial rescue breaths.
Place the heel of one hand on the centre of their chest and push down by 5cm (about two inches), which is approximately one-third of the chest diameter. The quality (depth) of chest compressions is very important. Use two hands if you can’t achieve a depth of 5cm using one hand.
After every 30 chest compressions at a rate of 100 to 120 per minute, give two breaths.
Continue with cycles of 30 chest compressions and two rescue breaths until they begin to recover or emergency help arrives.
Infants under one year old
Open the infant’s airway by placing one hand on their forehead and gently tilting the head back and lifting the chin. Remove any visible obstructions from the mouth and nose.
Place your mouth over the mouth and nose of the infant and blow steadily and firmly into their mouth, checking that their chest rises. Give five initial rescue breaths.
Place two fingers in the middle of the chest and push down by 4cm (about 1.5 inches), which is approximately one-third of the chest diameter. The quality (depth) of chest compressions is very important. Use the heel of one hand if you can’t achieve a depth of 4cm using the tips of two fingers.
After 30 chest compressions at a rate of 100 to 120 per minute, give two rescue breaths.
Continue with cycles of 30 chest compressions and two rescue breaths until they begin to recover or emergency help arrives. American Heart Association:
Untrained : If you’re not trained in CPR, then provide hands-only CPR. That means uninterrupted chest compressions of 100 to 120 a minute until paramedics arrive (described in more detail below). You don’t need to try rescue breathing.
Trained and ready to go : If you’re well-trained and confident in your ability, check to see if there is a pulse and breathing. If there is no breathing or a pulse within 10 seconds, begin chest compressions. Start CPR with 30 chest compressions before giving two rescue breaths.
Trained but rusty : If you’ve previously received CPR training but you’re not confident in your abilities, then just do chest compressions at a rate of 100 to 120 a minute. (Details described below.)
**The above advice applies to adults, children and infants needing CPR, but not newborns.
Before starting CPR, check:
Is the environment safe for the person?
Is the person conscious or unconscious?
If the person appears unconscious, tap or shake his or her shoulder and ask loudly, “Are you OK?”
If the person doesn’t respond and two people are available, one should call 911 or the local emergency number and get the AED, if one is available, and one should begin CPR.
If you are alone and have immediate access to a telephone, call 911 or your local emergency number, before beginning CPR. Get the AED, if one is available.
As soon as an AED is available, deliver one shock if instructed by the device, then begin CPR.
Remember to spell C-A-B
Compressions: Restore blood circulation
Put the person on his or her back on a firm surface.
Kneel next to the person’s neck and shoulders.
Place the heel of one hand over the center of the person’s chest, between the nipples. Place your other hand on top of the first hand. Keep your elbows straight and position your shoulders directly above your hands.
Use your upper body weight (not just your arms) as you push straight down on (compress) the chest at least 2 inches (approximately 5 centimeters) but not greater than 2.4 inches (approximately 6 centimeters). Push hard at a rate of 100 to 120 compressions a minute.
If you haven’t been trained in CPR, continue chest compressions until there are signs of movement or until emergency medical personnel take over. If you have been trained in CPR, go on to opening the airway and rescue breathing.
Airway: Open the airway
If you’re trained in CPR and you’ve performed 30 chest compressions, open the person’s airway using the head-tilt, chin-lift maneuver. Put your palm on the person’s forehead and gently tilt the head back. Then with the other hand, gently lift the chin forward to open the airway.
Breathing: Breathe for the person
Rescue breathing can be mouth-to-mouth breathing or mouth-to-nose breathing if the mouth is seriously injured or can’t be opened.
With the airway open (using the head-tilt, chin-lift maneuver), pinch the nostrils shut for mouth-to-mouth breathing and cover the person’s mouth with yours, making a seal.
Prepare to give two rescue breaths. Give the first rescue breath — lasting one second — and watch to see if the chest rises. If it does rise, give the second breath. If the chest doesn’t rise, repeat the head-tilt, chin-lift maneuver and then give the second breath. Thirty chest compressions followed by two rescue breaths is considered one cycle. Be careful not to provide too many breaths or to breathe with too much force.
Resume chest compressions to restore circulation.
As soon as an automated external defibrillator (AED) is available, apply it and follow the prompts. Administer one shock, then resume CPR — starting with chest compressions — for two more minutes before administering a second shock. If you’re not trained to use an AED, a 911 or other emergency medical operator may be able to guide you in its use5.Continue CPR until there are signs of movement or emergency medical personnel take over.
To read more on First Aid, click on the link below.
A heart attack is a medical emergency. Call 108 or your local emergency number if you think you or someone else is having a heart attack.
The average person waits 3 hours before seeking help for symptoms of a heart attack. Many heart attack patients die before they reach a hospital. The sooner the person gets to the emergency room, the better the chance of survival. Prompt medical treatment reduces the amount of heart damage.
Causes
A heart attack occurs when the blood flow that carries oxygen to the heart is blocked. The heart muscle becomes starved for oxygen and begins to die.
Symptoms
Symptoms of a heart attack can vary from person to person. They may be mild or severe.
Symptoms in adults may include:
Changes in mental status, especially in older adults.
Chest pain that feels like pressure, squeezing, or fullness. The pain is most often in the centre of the chest. It can last for more than a few minutes, or come and go.
Cold sweat.
Light headedness.
Nausea
Numbness, aching, or tingling in the arm (usually the left arm, but the right arm may be affected alone, or along with the left).
Shortness of breath.
Weakness or fatigue.
First Aid
If you think someone is having a heart attack:
Have the person sit down, rest, and try to keep calm.
Loosen any tight clothing.
Ask if the person takes any chest pain medicine such as nitroglycerin for a known heart condition help them take it.
If the pain does not go away promptly with rest or within 3 minutes of taking nitroglycerin, call for emergency medical help.
If the person is unconscious and unresponsive, call 108 (or your local emergency number) and begin CPR.
Continue CPR till the person recover or you get a medical support
How to do CPR?
Check the response
Check the carotid pulse for less than 10 second.
If in case of feeble pulse or no pulse start CPR. Perform 30 compression and 2 breathing and continue the cycle
Do Not:
Do NOT leave the person alone except to call for help if necessary.
Do NOT allow the person to deny the symptoms and convince you not to call for emergency help.
Do NOT wait to see if the symptoms go away.
Do NOT give the person anything by mouth unless a heart medicine (such as nitroglycerin) has been prescribed.
Prevention
Adults should take steps to control heart disease risk factors whenever possible.
If you smoke, quit. Smoking more than doubles the chance of developing heart disease.
Keep blood pressure, cholesterol, and diabetes in good control and follow your health care provider’s orders.
Lose weight if obese or overweight.
Get regular exercise to improve heart health.
Eat a heart-healthy diet.
Limit the amount of alcohol you drink. One drink a day is associated with reducing the rate of heart attacks.
To read more on First Aid, click on the link below.
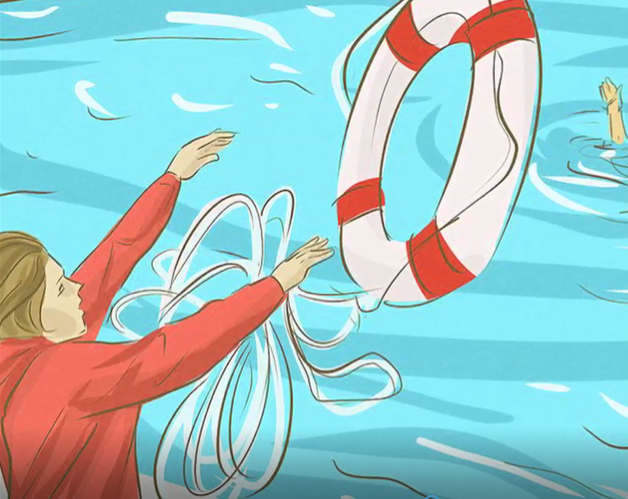
Notify a lifeguard, if one is close. If not, ask someone to call 102 ,108.
If you are alone, follow the steps below.
Move the Person
Take the person out of the water.
Check for Breathing
Place your ear next to the person’s mouth and nose. Do you feel air on your cheek?
Look to see if the person’s chest is moving.
If the Person is Not Breathing, Check Pulse
Check the person’s pulse for 10 seconds.
If There is No Pulse, Start CPR
Carefully place person on back.
For an adult or child, place the heel of one hand on the center of the chest at the nipple line. You can also push with one hand on top of the other. For an infant, place two fingers on the breastbone.
For an adult or child, press down at least 2 inches. Make sure not to press on ribs. For an infant, press down about 1 and 1/2 inches. Make sure not to press on the end of the breastbone.
Do chest compressions only, at the rate of 100-120 per minute or more. Let the chest rise completely between pushes.
Check to see if the person has started breathing.
Repeat if Person Is Still Not Breathing
If you’ve been trained in CPR, you can now open the airway by tilting the head back and lifting the chin.
Pinch the nose of the victim closed. Take a normal breath, cover the victim’s mouth with yours to create an airtight seal, and then give 2 one-second breaths as you watch for the chest to rise.
Give 2 breaths followed by 30 chest compressions.
Mouth-to-mouth resuscitation for a drowning victim :
Turn the drowning person’s head to the side, allowing any water to drain from his or her mouth and nose. Turn the head back to the center.
Begin mouth-to-mouth resuscitation on land, if possible, or in the water if the injured person needs immediate life-and-death measures.
Strongly breathe four times into the mouth of the injured person as you pinch his or her nose. This helps air get past any water that is clogging the breathing passageways and the lungs.
After four strong breaths, put your ear near the mouth and watch the chest for any breathing movement.
Check the pulse for signs of life.
Repeat the cycle.
***You’re not out of the water once the drowning victim starts to breathe and choke. In fact, the first 48 hours after a drowning incident can be the most dangerous. Complications resulting from water exposure—pneumonia, infection, heart failure—can all occur during this time. Therefore, you should always take a drowning victim to the hospital.
To read more on First Aid, click on the link below.
Medical Helpline in Andhra Pradesh, Gujarat, Uttarakhand, Goa, Tamil Nadu, Rajasthan, Karnataka, Assam, Meghalaya, M.P And U.P
108
Railway Accident Emergency Service
1072
Road Accident Emergency Service
1073
Road Accident Emergency Service On National Highway For Private Operators
1033
Relief Commissioner For Natural Calamities
1070
During an emergency, it is all too easy to become overwhelmed, or even confused and disoriented. With a little bit of preparation, you can ensure you go through any emergencies (or even minor scares) in the best way possible.
One of the best ways is to have all the information you might need during an emergency ready at hand.
Below you can find printable sheets with important emergency phone numbers and information customized to your area.
Print the emergency numbers and post them on the fridge and next to every phone in the house. Carry a copy with you, and have one in your car.
Fill out the extra information clearly, in large print using a dark pen. It should be easy to read by kids, or during emergencies when the lights may be very low.
Review the page every few months to make sure all the details are still up-to-date.
If you have a home alarm, make sure you and others in the home know how to use it to activate local emergency services (ambulance, police, fire station)