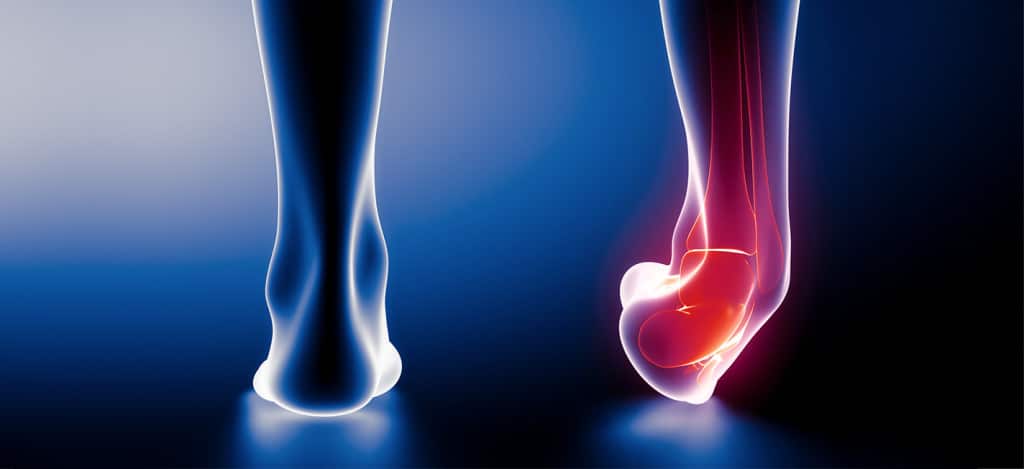
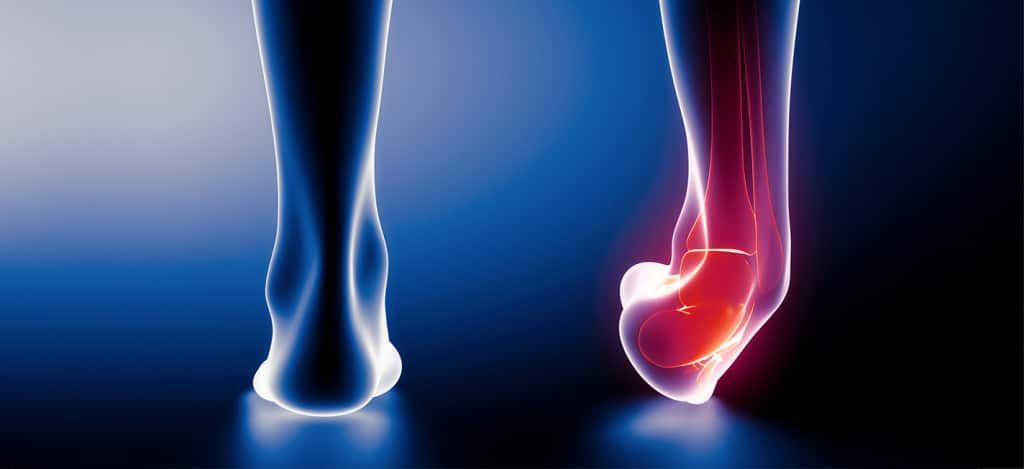
Ankle sprain is an injury that occurs when the ankle rolls, twists or turns in an awkward way.
A sprained ankle causes swelling, pain and limited range of motion.
Most of the time sprain can be managed at home with rest, ice and pain relievers. Severe sprains may need medical evaluation.
If you have pain or swelling that gets worse or doesn’t go away, see a doctor.
The RICE method is a simple self-care technique that helps reduce swelling, ease pain, and speed up healing.
The RICE method includes the following four steps:
Step 1: Rest
Pain is your body’s signal that something is wrong. As soon as you’re hurt, stop your activity, and rest as much as possible for the first 2 days. You should avoid putting weight on the injured area for 24 to 48 hours. Resting also helps prevent further bruising.
Step 2: Ice
Apply an ice pack (covered with a light, absorbent towel to help prevent frostbite) for 10 minutes, then remove for 10 minutes. Repeat this as often as possible for the first 24 to 48 hours after your injury.
Step 3: Compression
This means wrapping the injured area with an elastic medical bandage to provide support . The bandage should be snug but not too tight — if it’s too tight, it’ll interrupt blood flow. If the skin below the wrap turns blue or feels cold, numb, or tingly, loosen the bandage
Step 4: Elevation
This means raising the ankle above the level of your heart. You can prop your leg up on pillows while sitting on the sofa or lying on a bed . Doing so reduces pain, throbbing, and any internal bleeding that can lead to bruises.
To read more on Patient Care, click on the link below.
A smooth and speedy recovery depends on your help and cooperation. The patient participation is essential in reaching your goal at home and avoid complications (problems).
Important Points to Remember
Do not sit the leg crossed and do not bend the leg lesser than 45 degrees.
Do not sit on a lower floor chair or sofa/commode.
Use a pillow or foam wedge between your legs while you are in bed.
Wear leg compression devices to prevent blood clots and to reduce swelling. Also can elevate the leg with pillow support to reduce swelling
Sit on the edge of the bed and stand with help.
Sit up in a chair for meals and physical therapy
Do the ankle pumps. Do them 10 times every hour while you are awake.
Use a walker or crutches.
Do not bend forward while walking, keep the back straight.
Help when he need to get out of bed, get out of a chair or go to the bathroom to help prevent falls.
Do your exercises as directed by your physical therapist.
All the prescribed medicine need to be taken on time
In case of pain can apply ice pack but never any hot packs .
Wound will take few weeks to heal; until then wound care need to be followed. Proper cleaning and dressing changing is mandate.
Check for the following
Warning Signs of Infection
Persistent fever (higher than 100 degrees)
Shaking chills
Increasing redness, tenderness or swelling of your wound
Drainage from your wound
Increasing pain with both activity and rest
Warning Signs of Blood Clot
Pain in your leg or calf unrelated to your incision
Tenderness or redness above or below your knee
Severe swelling of your thigh, calf, ankle or foot
In very rare cases, a blood clot may travel to your lungs and become life-threatening. Signs that a blood clot has travelled to your lungs include:
Shortness of breath
Sudden onset of chest pain
Localized chest pain with coughing
Notify your doctor immediately if you develop any of the above signs.
Exercises Will Help Speed Recovery and Diminish Postoperative Pain. For example:-
Ankle Pumps.
Ankle Rotations.
Bed-Supported Knee Bends.
Buttock Contractions.
Abduction Exercise.
Quadriceps Set.
Straight Leg Raises.
Stair Climbing and Descending.
To read more on Patient Care, click on the link below.
The first phase of heart surgery recovery can last from 6 to 8 weeks. When you’re released from the hospital, you’ll get a set of instructions for post-surgery care. These will help you heal physically and feel better.
Care of the incision after heart surgery
In order to take proper care of the incision after heart surgery, it is important to:
Keep the incision clean and dry
Daily Dressing
Do not scrub or soak the wound
Do not use rubbing alcohol, hydrogen peroxide, or iodine, which can harm the tissue and slow wound healing.
Air-dry the incision or pat it dry with a clean, fresh towel before reapplying the dressing.
Eat a healthy diet
Seek medical advice if signs of infection appear. These include:
Increased drainage or oozing from the incision
Opening of the incision line
Redness or warmth around the incision
Increased body temperature (greater than 38°C)
You should also seek advice if it seems the sternum (breastbone) has moved, or if it pops or cracks with movement.
Pain relief after heart surgery
Some muscle or incision discomfort, itching, tightness or numbness along the incision are to be expected. However, the pain will be different from that experienced before surgery and painkiller medications will be prescribed.
For heart bypass surgery, there may be more pain in the legs than around the chest incision if leg veins were grafted. Walking, daily activities, and time, will help to lessen leg discomfort and stiffness.
The Don’ts.
Don’t stand in one place longer than 15 minutes.
Don’t lift things that weigh more than 10 pounds.
Don’t push or pull heavy things.
Walk every day. Follow the guidelines the doctor or cardiac rehabilitation specialist gives you. Unless you’ve been told not to, you can climb stairs.
Activity after heart surgery
For the first six to eight weeks, the following guidelines are recommended:
Gradually increase activity. Household chores can be done, but standing in one place longer than 15 minutes is not recommended
Climbing up and down stairs several times a day, especially when the patient first arrives home, is not recommended. Try to arrange activities so the patient goes downstairs in the morning and upstairs when it is time for bed
Diet after heart surgery
A healthy diet will help the healing process. It is common after surgery to have a poor appetite at first. If this is the case, try to eat smaller, more frequent meals. Appetite should return within the first few weeks. If it does not, seek medical advice.
Emotions after heart surgery
It is common for patients to feel sad. These feelings should go away after the first few weeks. If they do not, seek medical advice. It may help to:
Get dressed every day
Walk daily
Resume hobbies and social activities
Talk. Limit visits to 15 minutes at first, then increase them depending on how the patient feels.
Get a good night’s sleep
Join a support group or cardiac rehabilitation programme
Rest and Sleep
Many people have trouble sleeping after heart surgery. You should get back to a normal slumber pattern within a few months.
If pain keeps you up, take medication about half an hour before bedtime. Arrange the pillows so you can stay in a comfortable position.
You’ll probably need to rest after activity, but try not to take a lot of naps during the day.
In the evening, avoid caffeine, including chocolate, coffee, tea, and some sodas.
Settle into a bedtime routine, perhaps listening to relaxing music. Your body will learn these cues mean it’s time to snooze.
Call your doctor if a lack of sleep starts affecting your mood or behavior.
To read more on Patient Care, click on the link below.
1. Eye shield: Please use eye shield for protection when you sleep. You may use dark glasses during daytime. Please wash the eye shield and glasses with soap and water each day and dry the same before use.
2. Washing the face: Cleaning of the operated eye will be as per the instructions given by the doctor/ nurse. The rest of the face can be mopped with a clean and wet cloth. Avoid splashing water into the operated eye.
3. Shaving: Shaving is permitted. But avoid splashing water after shaving. Instead, clean with a wet cloth.
4. Bathing: You can bathe below neck from the first postoperative day itself. But avoid head bath for a period of 3-4 weeks.
5. Use of facial cosmetics: Avoid cosmetics to the eye such as mascara, eye liners etc for at least 4 weeks.
6. Physical activity: Activities such as walking, talking, TV viewing can be resumed immediately after surgery. However, Jogging, swimming, gardening, contact sports, etc may have to be avoided until 4-6 weeks after surgery.
7. Driving: Avoid driving till your surgeon gives you permission.
8. Joining back duties: Usually you will be allowed to join your duties by 4-6 weeks after surgery depending upon the surgery. You may have to check with your doctor regards to the exact date of joining duty.
9. The following symptoms may be expected after most surgeries: Some amount of redness, watering, foreign body sensation, and glare are common. The severity varies with the type of surgery. These symptoms will reduce with time and usually disappear by 4-6 weeks.
10. If you have any worsening of the symptoms and specifically if there is increasing redness, pain or decreased vision please report to your doctors
How to clean the eye:
The operated eye needs to be cleaned at least twice a day.
The attendant performing this task should wash the hands with soap and water and dry them with a clean towel.
Use the disposable tissue supplied at the home.
Cleaning the lower lid is done by asking the patient to look up and wiping all the secretions sticking to the lower lid margin.
Cleaning the upper lid is done by asking the patient to look down and doing similar procedure.
Similarly the outer and inner corners of the eye are cleaned.
Once the margins and corners are cleaned, the eye drops can be instilled and then the surrounding areas can also be cleaned.
Instillation of the eye drops:
The attendant should wash his/ her hands with soap and water.
The cap of the eyedropper bottle is opened carefully without contaminating the tip of the nozzle.
Pull the lower lid and place the drop between the eyeball and the lid by squeezing the bottle or cap as the case may be.
Wipe away excess medicine that may trickle out.
The eyes should be kept closed for a period of 5 minutes after the drop is instilled.
Eye ointment instillation:
Washing hands as for instilling drops
Lower lid is pulled down
The tube containing the ointment is squeezed gently so that a small thread of the ointment falls in the space between the eyeball and the lid. This should be not more than half a centimetre.
By letting the eyelid close, the ointment thread will break.
Instructions for instilling medicines in the eye:
Always instill drops before ointment.
Leave a gap of 5 minutes between two medications.
Keep the eye closed for 5 minutes after applying the medication.
Once opened the eye drops are discarded after 1 month.
Replace the cap of the bottle immediately after use.
Make sure that the right drops are being used for the right number of times.
If similar medication is advised for both eyes, it is advisable to have separate bottles for the two eyes.
Unused eye medication, once opened is discarded and never used for other persons.
General instructions:
Do not rub the eyes
Do not lift heavy weights
Do not allow the eye to get injured- the eye shield is meant to protect the eye from physical hurt.
Avoid too many visitors for fear of contacting infection- especially avoids visitors with conjunctivitis, cold etc.
Do not play with children since there is possibility of getting hurt in the eye.
Do not strain at toilet. If needed please take laxative.
Avoid use of snuff.
Cigarette smoking should be avoided.
Alcoholic beverages are best avoided.
Avoid using handkerchief to mop the eye. Use sterile tissue only.
Climbing steps is allowed
There is no specific diet restriction to be complied post eye surgery
If gas has been injected into your eyes as part of the treatment process, you should avoid air travel for minimum of 2 months or as instructed by your surgeon.
You should maintain head down/prone position after retinal detachment surgery, if silicon oil or gas bubble has been placed inside the operated eye.
The Dos
Use your eye drops on the schedule provided by your ophthalmologist.
Resume light daily activities such as reading, writing, watching TV and walking.
Keep physical activity light.
Wear your protective eye covering while you sleep and avoid sleeping on the side that has been operated on.
Bath and shower with your eyes closed.
The Don’ts
Rub your eye or get anything in your eye, even water, which can increase the chance of infection.
Swim or use a hot tub, for at least 2 weeks.
Drive for 24 hours after surgery.
Do any strenuous activity, especially bending and lifting anything 15 to 20 pounds or more.
Wear any eye make-up until you consult with your ophthalmologist.
To read more on Patient Care, click on the link below.
Injecting insulin is the essential part of the daily regime for many Diabetics patient. Although insulin that can be inhaled is now available and approved, the reality is that most type 1 diabetics (and type 2 diabetics who require insulin) will have to continue injecting insulin until it is more common.
Tips for Injecting Insulin
Injection sites: Insulin should be injected into the layer of fat that lies right under the skin. There are several areas on the body where you can inject your insulin. These include the:
Abdomen (Stomach), a few inches away from belly button
Outer thigh
Hips
Upper Buttocks
Back of the arms
Painful Injection: Now a day’s super thin needles are available in the market, Insulin injection are pretty much painless, If you are finding that your injection hurt’s, Try the followings;
Use a new needle for every injection. It’s tempting to reuse needles, but they can become dull even after just one or two injections. And the duller the needle, the more painful the injection.
Use the thinnest needle possible. The higher the gauge, the thinner the needle.
Use a short needle (6 mm or shorter).
Inject insulin at room temperature.
If you use alcohol to clean your injection site, make sure it’s completely dry before injecting.
Relax tense muscles make the nerves in the injection area more sensitive.
Larger doses of insulin (30 units or more) may be uncomfortable. If this is a concern, talk with your doctor about splitting your dose.
Rubbing ice on your skin before injecting may also help.
Insulin leaking from injection sites: It’s not unusual for insulin to leak out from the injection site after you withdraw the needle. Usually, the amount that leaks out is insignificant and likely won’t affect your blood sugar levels. To minimize or avoid leakage, try the following:
Count slowly to 10 before withdrawing the needle.
After removing the needle, place your finger on the site for 5–10 seconds.
If you use a pen, always remove the needle after you inject. Leaving the needle on can cause air to enter the cartridge and it will take longer to inject the insulin.
Try injecting at a 45-degree angle rather than going straight in.
Forgetting to take you insulin: Missing even just one injection per week can raise your HbA1c level by 0.5%. How can you remember?
Link taking your insulin with other daily habits, such as eating breakfast or brushing your teeth before you go to bed.
Keep your insulin and supplies in a convenient place. And think about keeping supplies both at home and at work (or school).
Don’t get distracted. Multitasking is never a good idea, especially when it comes to injections. If you’re doing too many things at once, you can easily forget to inject. Focus on the task at hand.
Set an alarm, use sticky notes, ask your spouse to remind you — all can help you to remember.
Fear of Needles: Injection can lead to anxiety and even physical symptoms, such as light-headedness, palpitations, dry mouth, sweating, and feeling sick. Here’s what can be helpful:
Make sure you’re using the shortest, thinnest needle that you can.
An insulin pen may be easier for you to use than a syringe.
Put a cold spoon or an ice cube on the injection site for a few minutes before you inject.
Ask your doctor about using a topical anesthetic, which can numb the surface of the skin.
To read more on Patient Care, click on the link below.
Talk with your doctor. You need to know about the specific blood tests your doctor is ordering. Some blood tests will require special preparation to get accurate results. For example, fasting Glucose test or lipid profile.
Fasting requirement: – 8 to 10 hour is the ideal fasting duration and only allowed to have sips of water.
Avoid alcohol:-It is better to avoid alcohol at least for a day of you are going for blood test especially for lipid profile
Food interactions:- some test result may shows some variations based on the prior meal ingredients
Activities:- Minimal activities are allowed (Especially for fasting glucose test you need to keep an overnight fasting so that your body will be under rest.) which will give an accurate result and also the bleeding will be minimal after the venipuncture
Hydrate well:- You should drink enough water so that the veins will be prominent for the procedure
Manage the stress:- The stress levels should be very minimal so that will receive an accurate report
Clarify the doubts regarding the test, report etc with the health care professional
Intimate the medical condition; do not prick advice from the doctor (in case of dialysis shunt/breast surgeries) and your current medicine details to the professional so that it will help them to perform the procedure well.
Confirm the test name while drawing the sample
Sit /lay down in a well lighted area, keep your arms straight on the arm rest or bed.
Post to the collection gently press the site with a cotton /never rub the area and attach a spot band aid
If in case of pain, reddish or bluish discolorations apply ice packs at least for 5 to 10 minutes for 4 days. If not healed then consult the doctor.
To read more on Patient Care, click on the link below.
Purpose of Consult a doctor or doctor visit are following :-
To identify and diagnose about the signs and symptoms of your complaints
To get a medical treatment of the diagnosis
To regular follow up
Papers to Carry
Medical History Card
Make sure you always bring along a record of your key information, including medical conditions, dates of past surgeries, current medications, doctors’ names and contact information, next of kin and contact information, health insurance and any drug allergies.
Changes to Your Medical Record
If you’ve received any new test results since your last visit, bring them with you, even if you believe your doctor has already seen a report. Having this information on hand at your appointment ensures that you’ll remember to discuss it with your physician. This is particularly important if you are seeing a new doctor or specialist.
Your Prescription Drugs
Before you leave home, gather all your medications and put them in a zip-lock bag. Tell your doctor if you’ve stopped taking any prescribed drugs or haven’t followed dosage instructions. Be honest: If you mislead doctors about prescription compliance, they may assume your medications are not working and prescribe even more.
Journal of Your Symptoms
If your visit is related to a new concern, you should be keeping a journal that documents your discomfort and how it has affected your daily life in the days or weeks since it began. If your appointment is focused on a chronic condition, your doctor may have asked you to keep track of your response to new at-home treatments; to record objective measures, like your blood sugar; or to note subjective perceptions, like the intensity of a recurring headache. Whatever the information, bringing the journal to your appointment can help your doctor better understand what has been going on.
List of Questions
List of Questions You should expect your physicians to be responsive to your concerns, but you need to do your part as well. Always come to an appointment with a list of questions prepared in advance. Brainstorm your questions well before your visit, then note down a concise list, arranged in order from most to least urgent. And don’t leave your doctor’s office without asking them.
Notebook and Pen
This may seem obvious, but it’s important to take notes throughout an office visit. If your doctor mentions an unfamiliar term, get him to spell it out. Don’t hesitate to push for clarifications. At the end of every visit, request a verbal summary and write it down. Before you leave the exam room, review what you’ve written about your treatment plan; if there’s anything you don’t fully understand, ask again.
Friend or Family Member
Having someone with you can provide crucial moral support. But it’s also a valuable means of ensuring that your doctor addresses your most important questions. A friend or relative may not be able to sit in during the physical exam, but he or she should be welcome when you and your doctor discuss diagnosis, testing or treatment. That’s when a companion can remind you of your primary questions and concerns.
Your Smartphone
There is always some downtime during an office visit. It’s also useful to have your phone on hand if it carries your calendar so you can schedule follow-up visits and screenings.
Snacks
Snacks so you can maintain your energy and mood.
Filing tips/ maintaining medical records
The first step in organizing your personal medical record is to collect hard (physical) copies of as much information about your treatments and diagnoses as you can from all your caregivers, including physicians, nurse practitioners, physiotherapists, psychologists, etc. Keep in mind that federal law requires all doctors and medical facilities to allow you access to your medical records.
Remember to be polite and patient when asking to access your medical files. Tell them it’s to establish your own personal records. Some doctors and medical facilities might be hesitant to allow you access due to fear of malpractice litigation.
Your caregiver may need some time to organize your medical information because it may not all be in a single file. Schedule an appointment to come back if that’s the case.
Keep in mind that a personal medical record combines all the medical information collected by each caregiver/medical facility that you’ve been to into a single file that’s easily accessed.
While law gives you the right to access most of your Patient Health Information (medical records, imaging, test results, billing records, etc.), some types of information are exempted. For example, you do not have a right to access psychotherapy notes (i.e., notes taken by a mental health professional during a counseling session) or documents compiled for use in a civil or criminal proceeding like medico legal cases.
Copy all the documents in your medical files. Once you’ve notified the caregiver of your intentions and they’ve organized your medical information, it’s time to make copies of it all. Your personal medical record should include copies of all test/lab results, diagnoses, treatment reports, radiology reports, progress notes insurance statements and referrals from each caregiver/medical facility you’ve visited. Don’t expect the actual caregiver to copy your file for you. Likely their support staff will be the ones to do the actual copying.
Although you own your medical information, you don’t own the actual paper, files and x-rays that your info is on, so don’t expect to walk out with the originals. You’re only entitled to copies from the originals.
Your caregiver/medical facility has the legal right to charge you a copying fee, so ask how much it might cost. They may charge per page or a flat fee for the copying service and it may vary according to the hospitals.
You’ll likely need to sign a release form at every facility that you request records from.
To read more on Patient Care, click on the link below.
Pre surgery steps to take to cut complication risks and help healing.
Preparation for Surgery
As a general rule, you should not eat or drink anything after midnight before your surgery. Under some circumstances, you may be given permission by your anesthesiologist to drink clear liquids up to a few hours before your anesthesia. If you smoke, quit smoking sooner before your surgery for better outcome or healing.
You must make arrangements for a responsible adult to take you home after your anesthetic or sedation. You will not be allowed to leave alone or drive yourself home. It is strongly suggested that you have someone stay with you during the first 24 hours. If you have local anesthesia only, with no sedation, it may be possible to go home without someone to accompany you. Check with your doctor first.
Some laboratory test should be done before surgery related to your illness as prescribed by your anesthesiologist/Surgeon.
Some medications should be taken and others should not. It is important to discuss this with your anesthesiologist. Do not interrupt medications unless your anesthesiologist or surgeon recommends it.
Wear loose-fitting clothes that are easy to put on and will fit over bulky bandages or surgical dressings. Leave your jewelry and valuables at home.
Details about hospital stay should be briefly provided before surgery.
Both written and verbal instructions will be given. Most facilities have both general instructions and instructions that apply specifically to your surgery.
In general, for 24 hours after your anesthesia:
Do not drink alcoholic beverages or use nonprescription medications.
Do not drive a car or operate dangerous machinery.
Do not make important decisions.
You will be given telephone numbers to call if you have any concerns or if you need emergency help after you go home.
To read more on Patient Care, click on the link below.
Preparing for Change of Doctors(from Gynaecologist to Paediatrician)
Gynaecologist Visit:-
Your postnatal check is to ensure that your vaginal blood loss and bladder and bowel function are normal; that your mood and social supports are satisfactory and to provide any breastfeeding support and advice.
Your doctor or midwife will want to see you four to six weeks after you give birth to check on your physical recovery from pregnancy and delivery, see how you’re doing emotionally, and address your needs going forward.
You may still be dealing with some pregnancy- or childbirth-related aches and pains, and you may have some questions about how your body has changed. You may also have questions about your labor and delivery and about postpartum issues like breastfeeding, birth control, exercise, sex, and work.
Paediatrician visit:-
Make a list of questions to ask with the Doctor.
Please book two appointments; a 15 minute appointment for yourself and a 15 to 30 minute appointment for your baby.
Please register your baby as a new patient when you call to make your appointments so that a new medical record can be commenced.
The main focus will be on your baby and will include a full examination. Your baby will be weighed and their length and head circumference measured.
Please take your baby’s Personal Health Record (red book) with you to this, and any future, appointments.
To read more on Patient Care, click on the link below.
X-ray involves exposing the part of the body to small dose of ionizing radiation to produce picture of the inside of the body. X-ray are the oldest and most frequently used form of medical imaging.
Safety tips prior diagnostic exam in radiology X-Ray/MRI/CAT Scan
If you are pregnant or may be pregnant, please tell to your Doctor or technologist.
Please leave your valuables at home or in your room in hospital.
Please arrive at least 15 minutes prior to your appointment.
Please let us know if you need a translator.
Please bring a least of your current medication.
If you have pacemaker, H/o kidney disease, Pregnancy, artificial heart valves, claustrophobia, Metallic implant, prosthesis etc. Inform your Doctor or technologist.
Take off some or all of your clothing and wear a hospital gown.
Remove metal objects, such as a belt, jewelry, dentures and eyeglasses, which might interfere with image results.
Refrain from eating or drinking for a few hours before your scan.
Preparation for the Exam
There is no special preparation for a diagnostic x-ray Exam.
Technologist will verify identification and exam requested.
During the Exam
The duration of the exam will vary but the average is about 15 minutes
The technologist will position you on the exam table, and give you instructions.
You will have the opportunity to ask the technologists questions.
After the Exam
If you are going home, you may resume normal activities.
Preparation for MRI/CT scans
MRI is a noninvasive medical test that physician use to diagnose medical condition. This technique is used in radiology to form pictures of anatomy and physiological processes of the body in both health and disease.
CT scan is a computerized tomography (CT) scan combines a series of X-ray images taken from different angles and uses computer processing to create cross-sectional images, or slices, of the bones, blood vessels and soft tissues inside your body. CT scan images provide more detailed information than plain X-rays do.
Preparation before MRI/CT scans
There is little preparation for an MRI/CT Scan
Take your daily medications as you normally would, unless instructed.
There are few dietary restrictions for an MRI or CT Scan
Please arrive at least 30 minutes prior to your exam and check in with the receptionist.
You will need to complete the MRI or CT Scan screening form.
To eliminate possible MR safety issues, you will be asked to change into a hospital gown/ Dress, A locker will be supplied to secure your belongings.
A technologist will verify your identification and the requested exam. Your screening form will be reviewed by the technologist in consultation with the radiologist if indicated. If MRI contrast is indicated for the exam, an IV catheter will be inserted in your arm by a nurse or technologist.
During MRI/CT Scan
The duration of the procedure will vary but the average is 45 minutes to one hour per body part.
You will be required to lie still during the actual MR scanning. Depending on the body part that is being examined, you may be instructed to hold your breath for up to 30 seconds.
The magnet is permanently open on both ends. It is well lit and there is a fan for patient comfort. There is also a two way intercom system for communication between patient and technologist. The part of the body being scanned will be placed in the middle of the magnet.
During the actual imaging, you will hear a loud intermittent banging noise.
The technologist will also provide you with an alarm button to alert the technologist of any discomfort you may experience at any point during the MRI exam.
Some MRI exams require an injection of intravenous MRI contrast. Inform the technologist if you experience any discomfort during the injection.
After MRI /CT scan
If a dye injection is used, the IV is removed from the arm before you go home.
Allergic reaction from dye is extremely rare. However, if you experience symptoms such as rash or shortness of breath, you should notify the technologist immediately if you are still at the imaging facility, or call your doctor or go to the nearest hospital if you have already left the imaging facility.
To read more on Patient Care, click on the link below.